Project Management
- This module is used to add project and their details.
- Projects and their details can be edited and deleted through this.
- User can also clone the existing project details and create new project
Screen: Landing Page
Steps
- Click on the
 Menu to open Project Management Landing Page.
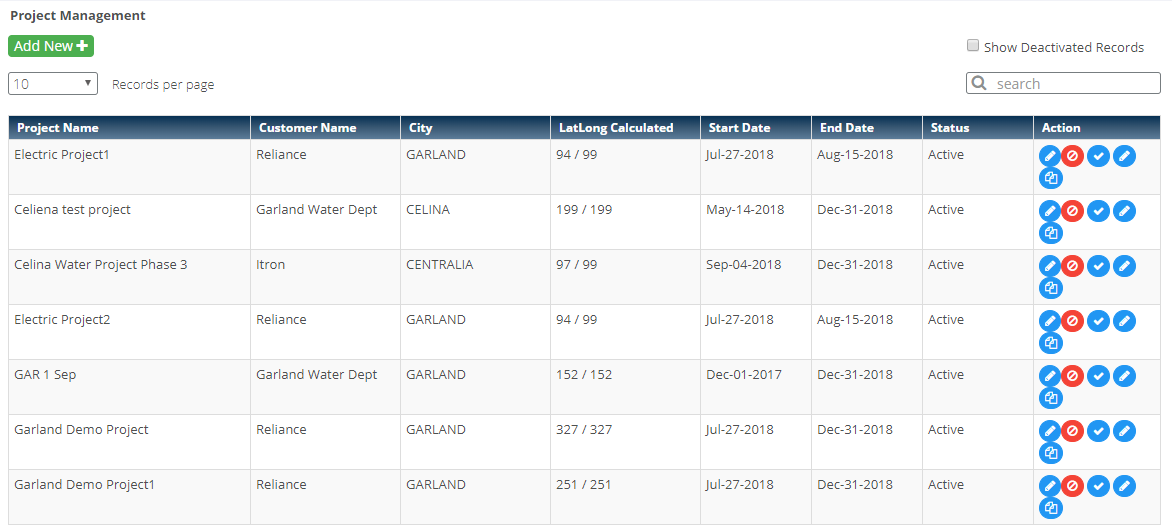
- It displays list of previously added Projects.
- Click on
 button to add new Project.
4. Following are the steps in creating a new Project
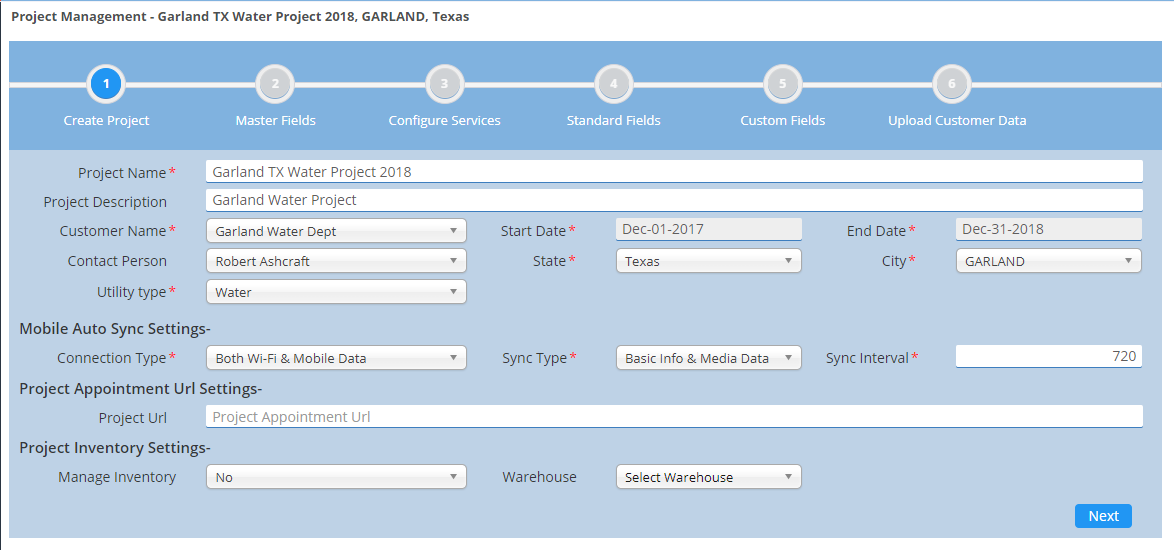
- Enter Project Name in the Project Name field.
- Enter Project Description in the Project description field.
- Select the Customer Name from the Customer name dropdown.
- This dropdown displays customer names names from the customer master.
- Here the project is linked to the concerned customer.
- Select the duration of the project.
- Select the contact person from contact person dropdown.
- This dropdown displays contact persons names added in the customer master for the selected customer.
- Select state and city for the project.
- State and city will be linked to all the addresses under this project.
- This way system can obtain geo location of all addresses.
- This will help in allocating addresses to installers which will be explained in detail in Installer allocation Part.
- Select the Utility Type.
- Utility Type defines the type of meter being used for this project.
- Utility Types are water, Gas and Electricity.
- Set Mobile Sync Setting
- Select the Connection Type.
- Connection Types are Wi-Fi Only, Mobile Data and, Both Wi-Fi and Mobile data.
- Wi-Fi only means auto sync in mobile application will occur only if Wi-Fi is enabled in the device.
- Mobile Data means auto sync in mobile application will occur only if Mobile Data is enabled.
- Both Wi-Fi and Mobile data means auto sync will occur when any of the two is enabled.
- Select the Sync Type.
- Basic Info Only
- Basic Info & Media Data
- Enter the sync interval.
- Sync interval is in minutes
- It defines the period after which mobile application will sync automatically.
- Project Appointment URL Settings
- Enter the Project Appointment URL.
- Set Project Inventory Settings
- If inventory settings is set as 'Yes', then user can install the inventory only if it is available in his inventory
- If inventory settings is set as 'No', then user can install the inventory even if it is not available in his inventory
- Select warehouse from drop down to map multiple warehouse to the project.
- Click on the Next button to move to next section.
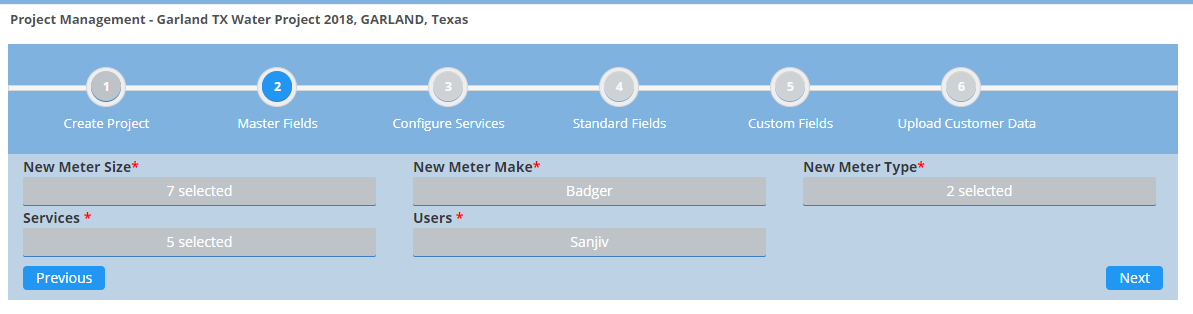
Master Fields are assigned to the project in this step.
- Select the meter sizes from the Meter Size dropdown.
- This dropdown is populated from Meter Size master data.
- User can select multiple values.
- Select the meter makes from the Meter Make dropdown.
- This dropdown is populated from Meter Make master data.
- User can select multiple values.
- Select the meter types from the Meter Type dropdown.
- This dropdown is populated from Meter Type master data.
- User can select multiple values.
- Select the services from the Services dropdown.
- This dropdown is populated from Services master data.
- User can select multiple services.
- Select the users from the users dropdown.
- This dropdown shows users from user master data.
- Multiple users can be assigned to a project.
- During form filling only selected data will be displayed for respective master field.
- Click on Next button to move to next section.
- Click on Previous button to move to previous section.
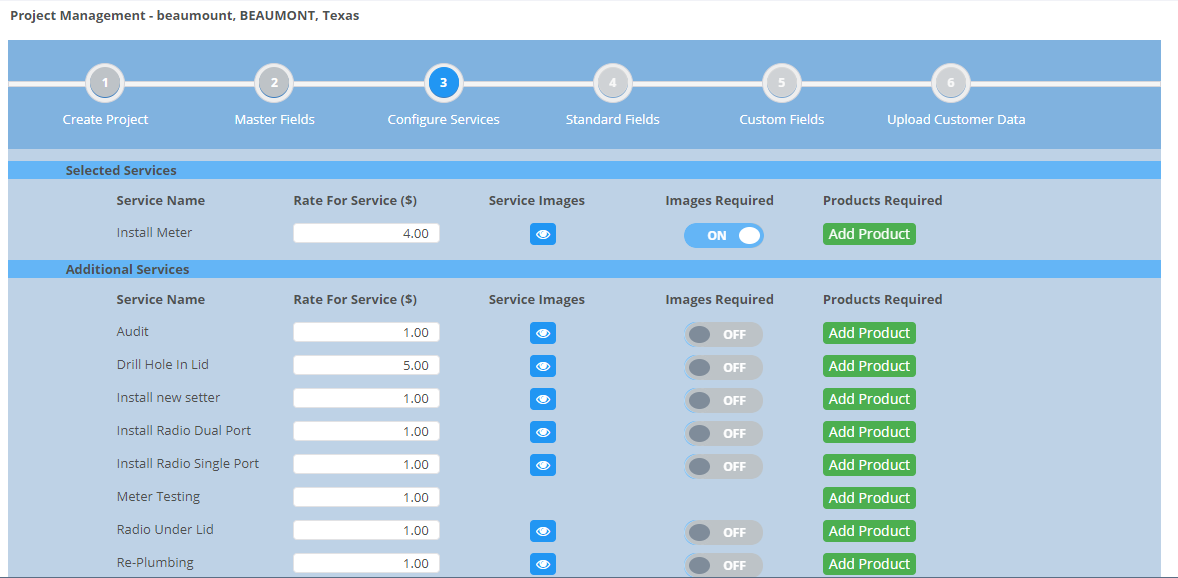
In this step rate for services can be changed and products can be added to the services
- Services linked to the project in the previous step (Selected Services) and Additional services (Remaining services) are displayed here in two separate sections.
- By default rate from masters are displayed corresponding to services.
- User can change the rate as the field is editable.
- User can view name of the pictures linked to these services.
- Pictures linked to services in the service master are only displayed corresponding to services.
- User can set whether capturing image for a service while meter installation is compulsory or not using Images required option.
- If Images Required option is ON, then capturing image for that service is compulsory.
- If Images Required option is OFF, then capturing image for that service is not compulsory.
- By default Images Required option is ON.
- User can also add products to the services
- Click on
 button to select the product and add quantity
- If inventory settings is set as 'No', this button will not be shown
- Following screen will open
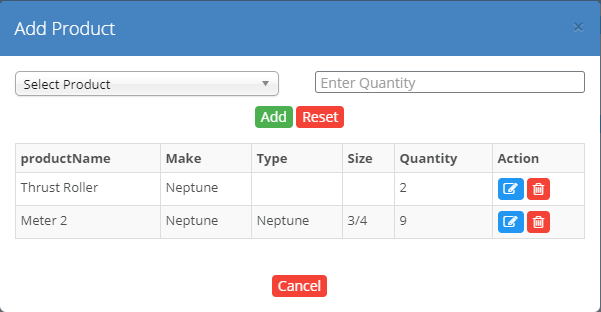
- Select product from the drop down
- Enter the quantity required for the product
- Click on
 button to add the details into the grid
- Click on
 button to reset the details
- Click on
 icon to edit the details
- Click on
 icon to delete the record
- Click on
 button to cancel the process
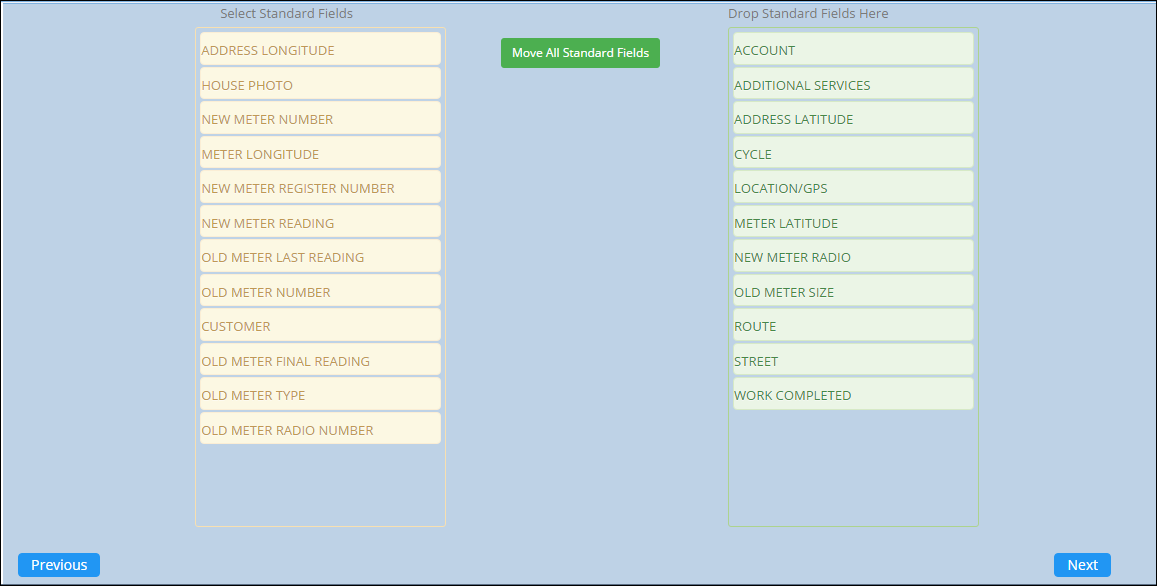
In this step, standard fields for the project will be selected.
- User will select standard fields for the project by just dragging and dropping the standard fields from the list of standard fields.
- Click on
 will move all fields from "Select Standard fields" section to "Drop Standard Fields Here" section.
- During form creation, only selected fields will be displayed. User will then select fields among these for form designing.
- Click on Next button to move to next section.
- Click on Previous button to move to previous section.
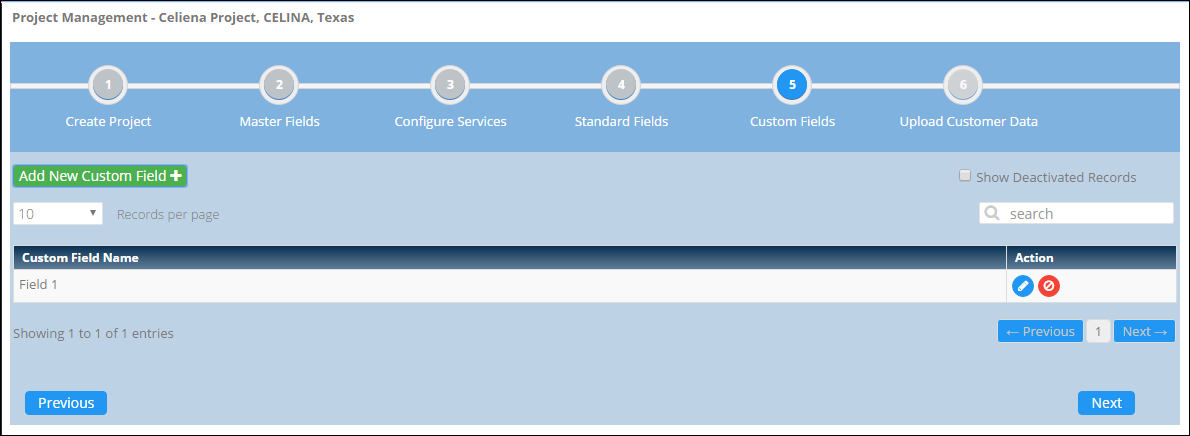
In this step, Custom fields for the project are added
- Click on
 button to add new custom field.
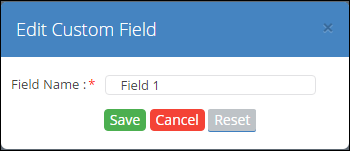
- Following screen will open
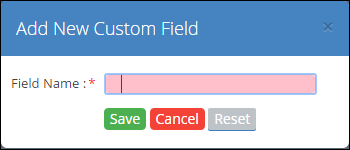
- Enter the Field Name.
- Click on
 button to save the Field.
- After saving, Field will be added to the grid on custom field landing page.
- Click on
 button to close the form.
- Click on
 button to reset all fields.
- Click on
 button to edit corresponding Field.
- Following Screen will open
- Edit the field.
- Click on button to save the Changes.
- Click on button to close the form.
- Click on Next button on custom field landing page to move to next section.
- Click on Previous button on custom field landing page to move to previous section.
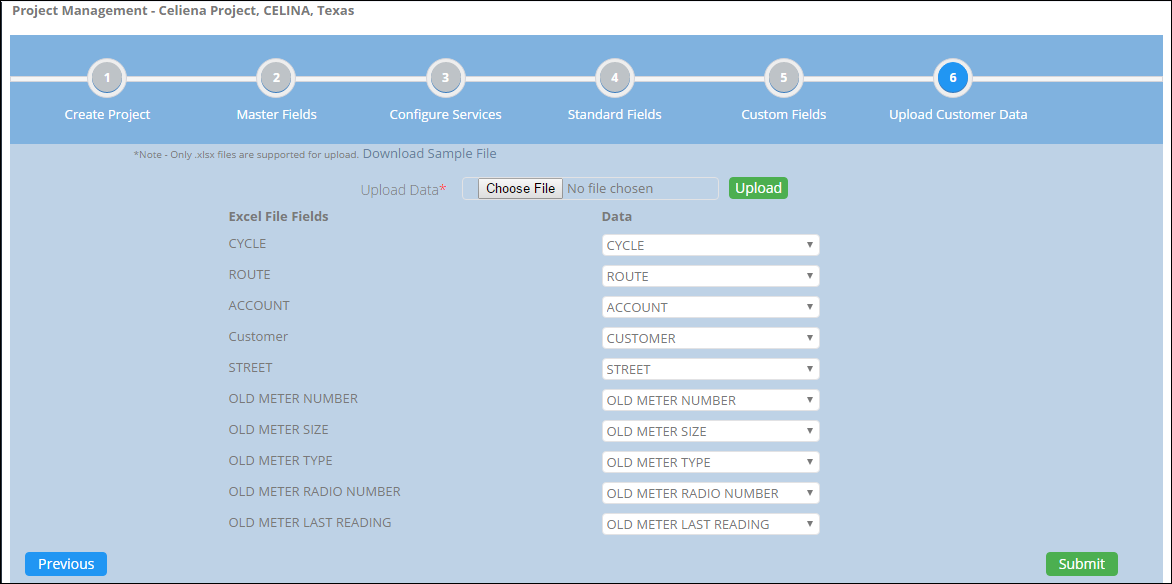
In this step, customer data for the project is uploaded in the system.
- Select the customer data file by clicking on choose file.
- Click on upload to upload the file in the system.
- After upload fields from uploaded excel files are displayed on the screen.
- User will map this fields with the current project fields.
- User will select the field to be mapped from the drop down.
- This dropdown displays standard field names.
- Mapping is done so that the field names remains standard and correct data is uploaded in correct fields.
- Click on
 to download sample file for reference.
- Click on submit to complete the Project creation process.
- Click on
 button to edit above mentioned sections.
- Click on
 button to change the status of the project to complete.
- Following pop up appears on clicking button.
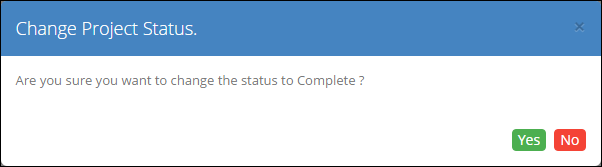
- Click on
 to change the status to complete.
- Click on
 to close the pop up.
- Click on
 button to edit uploaded data for the project.
- Following screen appears i.e. Edit Uploaded data landing page on clicking button.
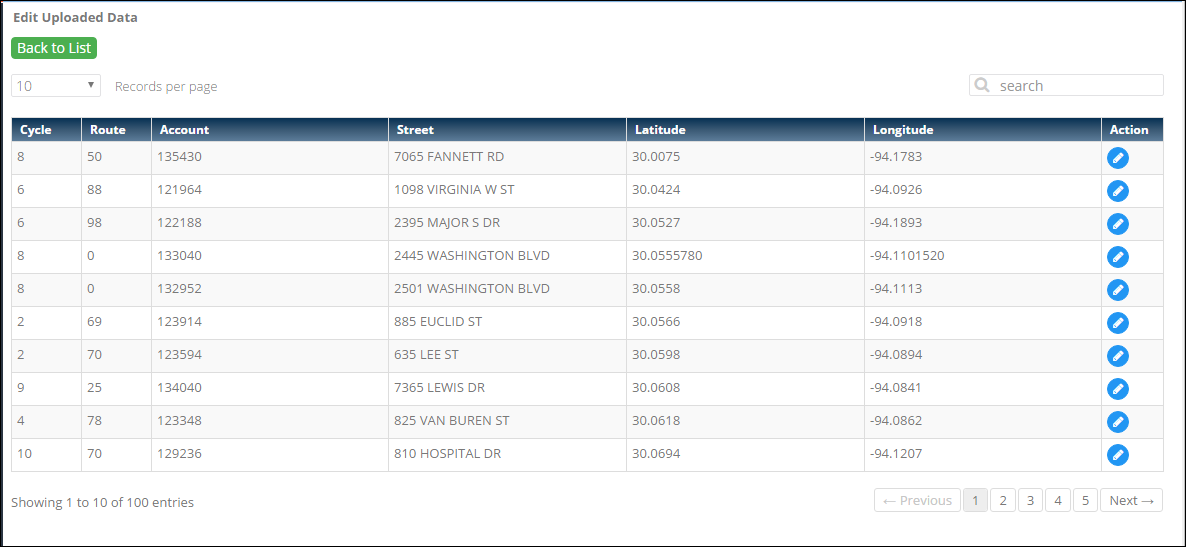
- List of all the uploaded record is displayed in the grid.
- Records with wrong data are displayed on top in the list.
- Click on button on this screen will display Edit Record.
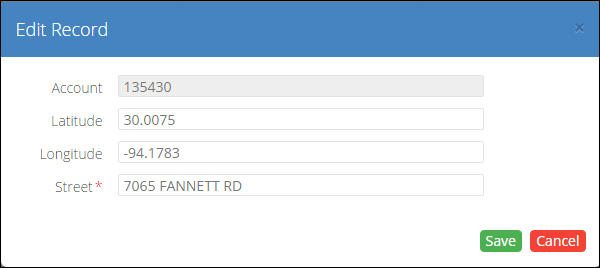
- Latitude, Longitude and Street Fields are editable.
- Edit the fields you require.
- Click on
 button to save the record.
- Click on
 button to cancel the form.
Created with the Personal Edition of HelpNDoc: Full-featured Kindle eBooks generator